"Poorly pressed patchwork produces pleats, puckers, and problems.
The better the pressing the better the finished quilt."
(quote from the Tips portion of Fons and Porter tv show)
The better the pressing the better the finished quilt."
(quote from the Tips portion of Fons and Porter tv show)
Attaching Borders properly is crucial
Does how you attach your borders make a difference? You betcha! Here is a great video on why and how to attach borders for the best outcome, a flat quilt. Fabric Patch video
How to Prepare Your Quilt for Longarm Quilting
Click HERE for a great article on how to prepare your quilt top for longarming, Quilt University.com
The largest width the machine can hold for backing is 116, so the largest your top should be is 110 wide. I can work with slightly larger but results can be varied due to not having extra room to test tension.
The quick version is:
TOP:
* Press your quilt top making sure all seams are flat.
* Snip all excess loose threads. Keep in mind any dark threads will show through lighter fabrics.
* Make sure there are no pins, buttons, embellishments, etc. (If there are, contact me so we can talk about it, I can usually work with these)
* If you need to mark the top of your quilt top use one safety pin or piece of masking tape.
Backing:
* Backing should be 4 inches larger on each side than the top (8 inches larger than the width and height).
* If back is pieced prepare like the top. You can press seams open.
* If it is not readily evident, please mark the right side of the fabric (as with batik fabric).
Batting:
* I can supply batting for you at a competitive price. If you provide your own batting it should be 4 inches larger on each side (8 total) than the top (as with the backing).
Bring the pieces separated, do not baste them together. They go onto the longarm frame rollers separately then get stitched together.
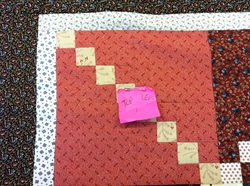
Here is a picture of how one of my customers marked the top of her quilt.
